
A Hands-On Guide to Local Deployment
Introduction
In Part 1 of this series, we explored the power of OpenSearch as a scalable, AI-driven search engine, its key features, and its growing adoption in the industry. This article builds on that foundation by guiding you through practical steps to deploy OpenSearch locally and explore its capabilities firsthand.
By the end of this guide, you’ll have a fully functional OpenSearch cluster running on your machine, ready for experimentation. Whether you’re testing OpenSearch for personal projects or preparing for enterprise deployment, this hands-on approach will give you the confidence to work with OpenSearch effectively.
Getting Started: Exploring Without Installation
Before diving into local setup, let’s explore OpenSearch through its playground environments. These are pre-configured demo environments where you can experiment with OpenSearch without any installation.
1. OpenSearch Playground
- URL: https://playground.opensearch.org
- What You Can Do: Explore prebuilt dashboards, sample data, and basic functionalities in a read-only environment.
- Why It’s Useful: Perfect for getting a feel for OpenSearch Dashboards and its core features before setting up your own instance.
2. ML & Search Demo
- URL: https://ml.playground.opensearch.org
- What You Can Do: Experiment with vector search and semantic search applications.
- Why It’s Useful: Ideal for understanding how OpenSearch integrates AI and machine learning into search workflows.
3. AI-Powered Search Demo
- URL: http://ai.playground.opensearch.org
- What You Can Do: Test natural language queries (requires a Google login).
- Why It’s Useful: Great for exploring OpenSearch’s AI-driven search capabilities.
4. Nightly Builds Playground
- URL: https://playground.nightly.opensearch.org
- What You Can Do: Access cutting-edge features from the latest builds.
- Why It’s Useful: If you want to stay updated with the latest developments in OpenSearch.
Setting Up OpenSearch Locally
Once you’ve explored the playground environments, it’s time to set up your own local OpenSearch cluster. This will give you a fully functional environment to experiment with indexing, querying, and custom configurations.
Prerequisites
Before proceeding, ensure the following:
- No Conflicting Services: Ensure no other services (like Elasticsearch) are using ports
9200(OpenSearch API) and5601(OpenSearch Dashboards). - Choose a Container Runtime: You can use either Docker or Podman for this setup. Podman is recommended for a fully open-source setup.
- Basic Familiarity with the Terminal: This guide assumes you’re comfortable with basic command-line operations.
Docker vs. Podman: Which to Choose for Your Local OpenSearch Setup?
Both Docker and Podman allow you to run OpenSearch in containers, but they differ in philosophy and features. Dockeris widely adopted, beginner-friendly, and integrates seamlessly with many development tools and CI/CD pipelines. If you’re already using Docker in other projects, it’s a convenient and consistent choice.
Podman, on the other hand, is a daemonless, open-source alternative that emphasizes security and rootless containers. It’s especially suitable for users who prefer or require an entirely open-source stack, or who work in environments with strict security requirements (e.g., Red Hat-based systems).
If you’re just experimenting locally and value ease of use and compatibility, go with Docker. If you’re building a production-like environment with a focus on open-source purity and security, Podman is worth the slight learning curve.
Step 1: Prepare Your Environment
- For Docker Users: Install Docker if you haven’t already.
- Create a directory for your OpenSearch cluster:
mkdir opensearch-cluster && cd opensearch-cluster3. Download the configuration file
curl -O https://raw.githubusercontent.com/vidanov/open_search/main/part2-local-setup/docker-compose.ymlFor Podman Users:
If you prefer Podman, install it:
brew install podman

podman machine init --memory 8192 --cpus 4 --disk-size 50
podman machine start

# GUI (for better management)
brew install --cask podman-desktop

# Install podman-compose
brew install podman-compose
Step 2: Set Up Your Cluster
Configure the OpenSearch administrator password.
Set your admin password (minimum 8 characters required):
touch .env
#Choose and set your password here
echo "OPENSEARCH_INITIAL_ADMIN_PASSWORD=YourSecurePassword123!">.env
or create a .env file in the folder.
Start the Cluster
For Docker Users:
Run the following command to start your cluster in detached mode:
docker-compose up -dFor Podman Users (the same command will work too, because podman has the docker compatibility mode and can use the docker-compose command):
podman-compose up -d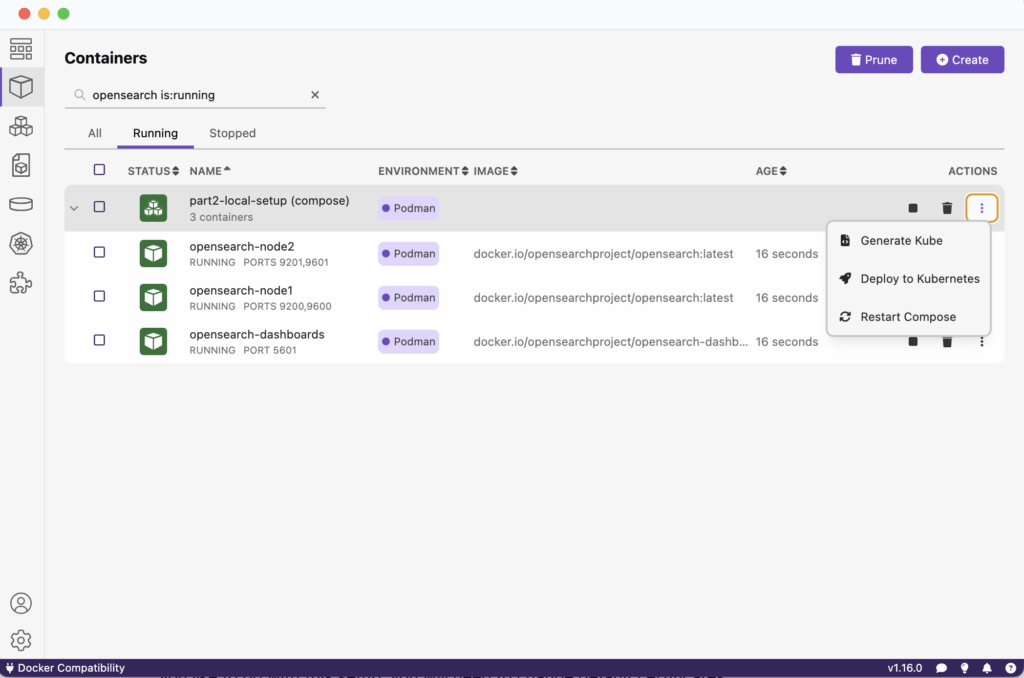
Step 3: Access Your OpenSearch Cluster
Once your cluster is running, you can access the following services:
- OpenSearch Dashboards
- URL: https://localhost:5601
- Credentials:
- Username:
admin - Password:
YourSecurePassword123!
- Username:
- OpenSearch API Endpoint
Step 4: Verify Your Setup
- Check Cluster Health:
Run the following command in your terminal to ensure your cluster is healthy. A healthy cluster should return a status ofgreen.:
curl -X GET "https://localhost:9200/_cluster/health?pretty" -u admin:YourSecurePassword123! -k- Explore the Dashboards:
Log in to OpenSearch Dashboards and familiarize yourself with the interface. You can create indices, ingest data, and run queries directly from the Dev Tools section.
Important Notes for Your Local Setup
- First Startup Time: The first startup may take 3–10 minutes depending on your hardware and internet connection speed.
- Multi-Node Configuration: This setup uses a multi-node configuration as defined in
docker-compose.yml. You can modify this file to adjust node roles or scaling. - Data Persistence: Data will persist in the volumes managed by docker or podman.
- Security Considerations:
- For the production I suggest to use the managed clusters on AWS, but if you like to go with this setup, you will need to change default certificates and do other fine tuning to harden it.
- Implement proper network security measures.
- Set up backups to avoid data loss.
Next Steps
Now that you’ve set up your local OpenSearch cluster, here are some activities to explore:
- Index Creation and Data Ingestion
Learn how to create indices and ingest sample data to start experimenting with search queries.
Conclusion
In this hands-on guide (Part 2 of our OpenSearch series), you’ve learned how to explore OpenSearch through its playground environments and set up your own local cluster for experimentation purposes By following these steps you’ve taken your first practical steps toward mastering OpenSearch Stay tuned for future articles where we’ll dive deeper into advanced topics such as index management query optimization security best practices